Web-Based Visualization using ROS JavaScript Library
This tutorial will give you an introduction to the ROS JavaScript Library (roslibjs) and how you can use it in your own projects to interface with web-based platforms or GUIs.
There exists a suite of ROS JavaScript libraries developed by https://robotwebtools.org/ such as roslibjs, ros2djs, and ros3djs. The roslibjs library is the core JavaScript library for interacting with ROS from the browser. It uses web sockets to connect with rosbridge and provides publishing, subscribing, service calls, actionlib, TF, URDF parsing, and other essential ROS functionality. The ros2djs and ros3djs are libraries built upon these to support more advanced HTML3 based plug ins to visualize occupancy grids, URDF models, all of the standard ROS visualization markers, point clouds, and many more types of messages.
The scope of this tutorial is only to introduce you to the roslibjs library as the procedure and general work-flow remains the same for the other libraries as well.
Setting Up ROS Bridge Server
First, we need a way to convert ROS messages to a format that can be used in web applications. To do this, we will use the rosbridge_suite package. Rosbridge provides a JSON API to ROS functionality for non-ROS programs. There are a variety of front ends that interface with rosbridge, including a WebSocket server for web browsers to interact with. To setup rosbridge, run the following commands.
sudo apt-get install ros-kinetic-rosbridge-server
Now, you can just start the rosbridge server, which will automatically make all the existing topics available to your web application.
roslaunch rosbridge_server rosbridge_websocket.launch
You can also add it into your launch file and customize the port number.
<launch>
  <include file="$(find rosbridge_server)/launch/rosbridge_websocket.launch" >
     <arg name="port" value="9090"/>
  </include>
</launch>
Setting up your Web Application
It is very simple to develop and setup a web application on your local machine. All you need to do is create folder for your application and create file within it name index.html which will have all the functionality for application. Additionally you can create multiple folder for your libraries and assets to organize your web app.
To test your web app, simply open the file index.html in your web browser. Note that, there are some functionality that might not work when you directly open the HTML file, one may need to start a HTTP server to make that work. In order to that just use Python’s in-built HTTP server.
cd your/web/app/folder
python3 -m http.server 8000
Navigate to 127.0.0.1:8000 in your browser to open your web application.
Basic ROS JavaScript Interface
Once you the setup ready, we can now go ahead developing your application. A website basically consists of three main components, the structure defined by HTML, the functionality implemented by JavaScript (in our case), and the style or the looks of your website defined by CSS. The tutorial assumes that you already have the HTML/CSS part developed for application or you can get a free dashboard template online of your choice.
Let us now move on to interfacing your web app with ROS JavaScript in index.html.
- First, we need to connect to our ROS bridge server setup earlier with the same port number.
var ros = new ROSLIB.Ros({
    url : 'ws://localhost:9090'
  });

  ros.on('connection', function() {
    console.log('Connected to websocket server.');
  });

  ros.on('error', function(error) {
    console.log('Error connecting to websocket server: ', error);
  });

  ros.on('close', function() {
    console.log('Connection to websocket server closed.');
  });
- Now, we can subscribe to any topic and the library will help us parse us the message and raise a callback for us.
var listener = new ROSLIB.Topic({
    ros : ros,
    name : '/listener',
    messageType : 'std_msgs/String'
  });

listener.subscribe(function(message) {
    console.log('Received message on ' + listener.name + ': ' + message.data);
    listener.unsubscribe();
  });
You can view the message data on your web console. You can access all your ROS message fields from the message object including the header and timestamps of the messages like message.header.stamp.
- That’s it! You have developed your first basic Hello World application. Your entire
index.htmlwould look something like this and your HTML layouts would go inside thebodytag.
<!DOCTYPE html>
<html>
<head>
<meta charset="utf-8" />

<script type="text/javascript" src="http://static.robotwebtools.org/EventEmitter2/current/eventemitter2.min.js"></script>
<script type="text/javascript" src="http://static.robotwebtools.org/roslibjs/current/roslib.min.js"></script>

<script type="text/javascript" type="text/javascript">
  // Connecting to ROS
  var ros = new ROSLIB.Ros({
    url : 'ws://localhost:9090'
  });

  ros.on('connection', function() {
    console.log('Connected to websocket server.');
  });

  ros.on('error', function(error) {
    console.log('Error connecting to websocket server: ', error);
  });

  ros.on('close', function() {
    console.log('Connection to websocket server closed.');
  });

  // Subscribing to a Topic
  var listener = new ROSLIB.Topic({
    ros : ros,
    name : '/listener',
    messageType : 'std_msgs/String'
  });

  listener.subscribe(function(message) {
    console.log('Received message on ' + listener.name + ': ' + message.data);
    listener.unsubscribe();
  });
</script>
</head>

<body>
  <h1>Simple roslib Example</h1>
  <p>Check your Web Console for output.</p>
</body>
</html>
Some More ROS JavaScript Interface for Developing GUIs
You can do more advanced stuff such as subscribing to images, Rviz visualizations (see this tutorial for more information), and monitor diagnostics from your nodes.
To visualize and update an image stream live within your web app, first you need a placeholder in HTML for your image. Define it as follows within the body tag with an unique ID to update it later via JavaScript.
<img id="my_image" style='height: 100%; width: 100%; object-fit: contain' src="/assets/images/placeholder.png">
Now, you can create a topic handler and subscribe to your image from ROS. Note that, if you want to integrate image streams with roslibjs, the ROS socket bridge expects images in compressed format. See this section here for more details on setting up image compression for your topics.
var image_topic = new ROSLIB.Topic({
  ros: ros, name: '/stream1/image/compressed',
  messageType: 'sensor_msgs/CompressedImage'
});
Now, all you need to do is update the src field of your image with the data received from your ROS topic.
image_topic.subscribe(function(message) {
  document.getElementById('my_image').src = "data:image/jpg;base64," + message.data;
  image_topic.unsubscribe();
});
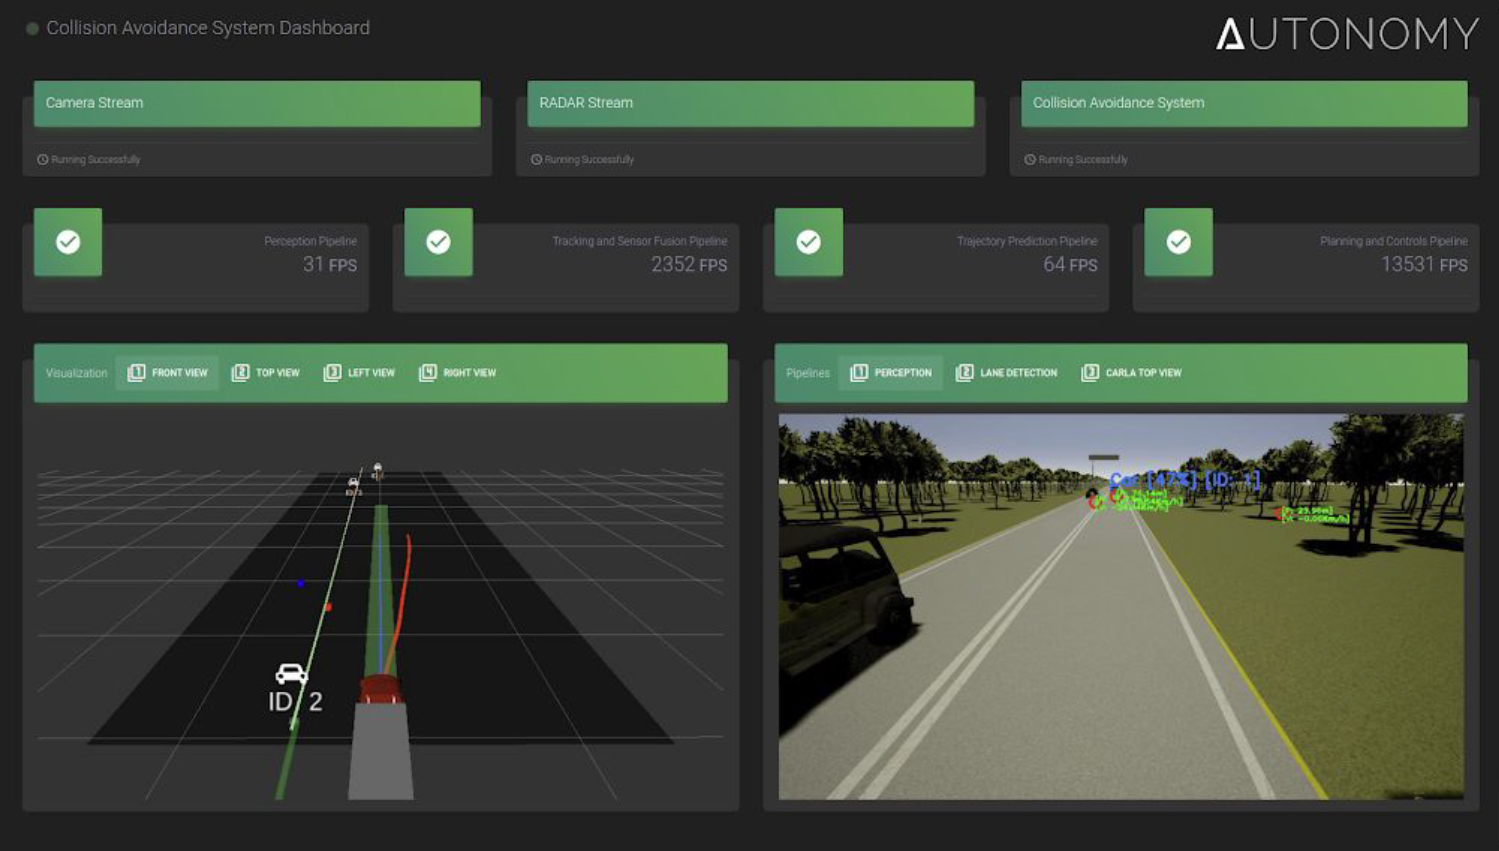
Here is an example of a dashboard (DeltaViz) for Delta Autonomy developed by me. The GUI makes use of ROS diagnostic message to monitor FPS of different nodes in the pipeline, subscribes to images and virtual camera stream from Rviz, and also has sound alerts and flashes to notify the users (developed for their specific use-case). The source code is available on our repository here.
See Also
- A tutorial on setting up virtual cameras and lighting in Rviz and stream these images which can be used in your GUI or for other applications within ROS.
Further Reading
- There is a lot more you can do with
roslibjs. Check out the official wiki here for more advanced tutorials. - Refer to the
delta_vizrepository developed by Delta Autonomy, which is a web-based dashboard GUI that implements all of what’s covered in this tutorial.
References
- http://wiki.ros.org/roslibjs/Tutorials/BasicRosFunctionality