Fabrication Considerations for 3D printing
There is more to 3D printing than designing components and parts and replicating those 3D solid models into useful assemblies. When beginning a design, one must take into account the 3D filament to use, the 3D printing equipment, the model’s final resolution and the limitations of each 3D CAD software to fabricate quality parts. By keeping these key elements in mind, along with repetition, the 3D printing practitioner and designer will maximize his/her efforts, resulting in high-quality finished products.
Following are some of the main consideration one must keep a note of while designing and fabricating parts using 3D printing:
1. Wall Thickness
The wall thickness defines the number of times the extruder will lay filament around the perimeter of your model before switching to your infill factor. (Infill is defined separately as a percentage. Typically, 10% or 20% works well for infill.)
Your wall thickness should be defined as a multiple of your nozzle diameter so a .4mm nozzle with a .8mm wall thickness would result in the printer laying a perimeter two thicknesses wide for each layer. This is the case with the MakerBot Replicator 2.
It is most important to keep this in mind when you are drawing very thin walls. When parts of your model are thin, the perimeter walls are so close together that it doesn’t leave much room for infill in between them. Sometimes, it may not properly fuse the walls to each other, leaving a hollow gap between the walls on the inside of the model.
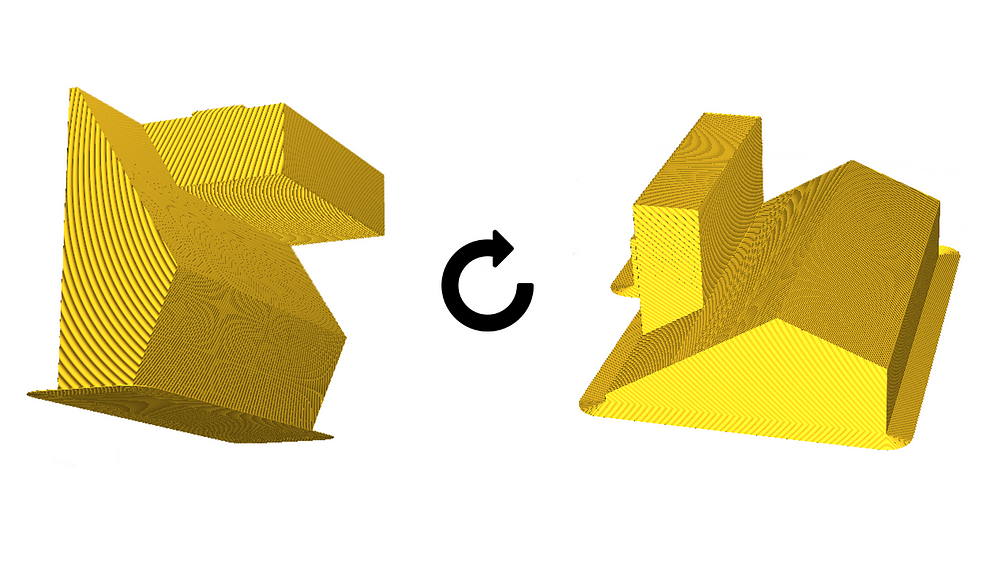
2. Part Orientation

Part Orientation plays a vital role in determining the final finish of the 3D printed part. In the image above, 4 possible configurations are shown in which the object can be 3D printed. The part orientation while printing affects the following:
- Time of printing
- Surface Quality
- Mechanical properties (Tensile and Shearing)
- Supports and Overhanging structure
In the above case, it is best to print the part in the configuration shown in lower left i.e. laying along the surface having the maximum surface area.
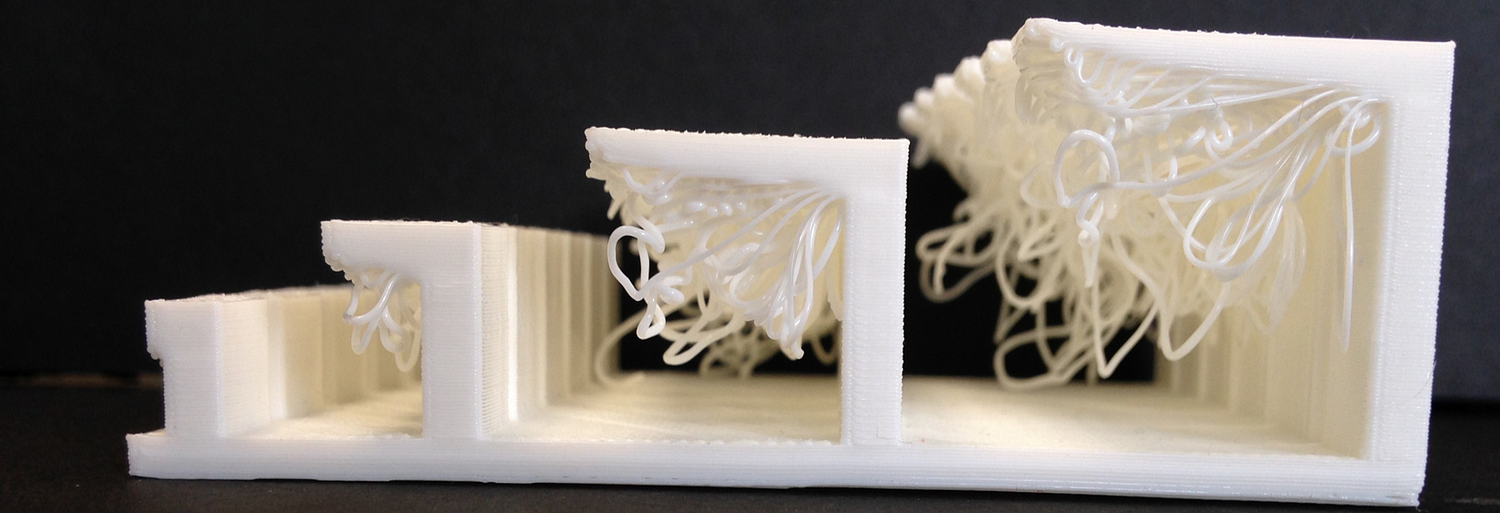
3. Overhangs and supports
A 3D printing overhang is any part of a print that extends outward, beyond the previous layer, without any direct support.
Usually, overhangs up to 45 degrees can still be printed without loss of quality. That’s because any layer in a 45-degree overhang is 50% supported by the layer beneath. In other words, each new layer has enough support to remain intact and to make printing possible.
However, anything past 45 degrees approaches the horizontal and becomes difficult to print. Such overhangs are prone to curling, sagging, delamination, or collapsing. Exceeding 45 degrees means every new layer has less of the previous layer to bond with. This translates to a poor quality print with droopy filament strands.
How to deal with Overhangs?
- Enable support structures.
- Orient the object to minimize the need for support structures.
- Slicing i.e. divide the part into subcomponents and glue them together at the end.
4. Warping & Shrinkage
Warping occurs due to material shrinkage while 3D printing, which causes the corners of the print to lift and detach from the build plate. When plastics are printed, they firstly expand slightly but contract as they cool down. If material contracts too much, this causes the print to bend up from the build plate. Some materials shrink more than others (e.g. PC has a higher shrinkage than PLA), which means there’s a larger chance of warping when using it.
How to deal with warping?
- Use Raft: A raft or brim is basically underground for your product. You print a number of very light layers under your product. This ensures fewer shrinkage differences and tensions at the bottom of your product. If there is warping, then this mainly affects the raft instead of your product. It is therefore important that the raft is wider than your product so that it does not cause problems when the corners curl up.
- Temperature Control: Choose a printer where the cooling of the product is as gradual as possible. For this purpose, a closed and conditioned box is essential, among other things. This way you have control over the temperature in the cabinet to minimize differences in shrinkage.
- Ensure the build plate is leveled correctly.
- Apply an adhesive: When using a heated build plate, it’s recommended that you apply an adhesive to the glass plate. Please refer to the type of material and compliant adhesive.
5. Tolerance
Tolerances describe how much deviation from a particular value is expected or acceptable. While 3D printing the part may slightly deviate from the actual dimensions. A tighter tolerance indicates higher dimensional accuracy.
The tolerance can be improved by:
- Use better filament
- Properly calibrate the printer
- Check the motion components
- Place the component at the center of the printing base
6. Material
The choice of material can be crucial for designing 3D printed materials. Here we discuss the two most widely used materials for 3D printing.
PLA
PLA (Polylactic Acid) is one of the two most commonly used desktop 3D printing filaments. It is the “default” recommended material for many desktop 3D printers, and with good reason - PLA is useful in a broad range of printing applications, has the virtue of being both odorless and low-warp, and does not require a heated bed.
Printing Filament Properties:
- PLA filament is a stiff but brittle 3D printing material.
- Well suited for prototyping
- Best for low-stress applications. Should not be the major load bearing of a mechanical structure.
- Best 3D printer material for beginners due to the ease of printing and minimal warp.
Technologies: FDM, SLA, SLS
PLA material properties for printing:
-
Strength: High Flexibility: Low Durability: Medium - Difficulty to use: Low/li>
- Print temperature: 180°C – 230°C
- Print bed temperature: 20°C – 60°C (but not needed)
- Shrinkage/warping: Minimal
- Soluble: No
ABS
Acrylonitrile Butadiene Styrene or ABS for short is created from Acrylonitrile, Butadiene and Styrene polymers. It is a material commonly used in personal or household 3D printing, which is done using primarily FDM. If you are used to printing with PLA, you’ll probably find ABS a little trickier to print with.
ABS Filament: What are the Proper Settings? It can be quite some task for a newcomer to find the right settings. No spool is alike, and the specifications may vary. Make sure you cover these bases:
- Close the printer: Before printing, make sure your 3D printer is either closed or that the ambient temperature of your environment isn’t too hot or too cold.
- Use a heated bed: Set the temperature to 110 degrees Celcius. Also, think about using Kapton (blue) on your glass build plate. If you still have problems with the first layer adhesion of your ABS filament, you should use a raft.
- Experiment with the temperature: Set the nozzle temperature to 230 degrees and work your way from there.
- If you see a lot of plastic strings between separate parts and the printer oozes material, lower the temperature by 5 degrees.
- If the filament doesn’t stick, the parts aren’t sturdy or the surfaces have a rough feel, increase the temperature by 5 degrees.
ABS 3D Printing Filament Properties:
- ABS filament is strong, ductile material with wear resistance and heat tolerance.
- Common 3D prints with ABS are Interlocking parts like gears, parts exposed to UV and heat like a car cup holder, or prototyping.
- A wide selection of methods for excellent post-processing.
Technologies: FDM, Binder Jetting, SLA, PolyJetting
ABS properties:
-
Strength: High Flexibility: Medium Durability: High - Difficulty to use: Medium
- Print temperature: 210°C – 250°C
- Print bed temperature: 80°C – 110°C
- Shrinkage/ warping: Considerable
- Soluble: In esters, ketones, and acetone.
Further Reading:
-
Design considerations for 3D printing: https://www.3dhubs.com/knowledge-base/key-design-considerations-3d-printing
-
Calibrate your 3D printer: https://all3dp.com/2/how-to-calibrate-a-3d-printer-simply-explained
-
Calibrate extruder: https://all3dp.com/2/extruder-calibration-6-easy-steps-2
-
Dimensionality test: https://www.youmagine.com/designs/make-2016-3d-printer-shootout-models
-
How to fix warping: Tutorial bu Ultimaker: https://ultimaker.com/en/resources/19537-how-to-fix-warping
-
Accuracy of 3D printing materials: https://www.3dhubs.com/knowledge-base/dimensional-accuracy-3d-printed-parts
References:
-
Printing using ABS material: https://all3dp.com/abs-3d-printer-filament-explained
-
3D Printing material available: https://all3dp.com/1/3d-printer-filament-types-3d-printing-3d-filament
-
Printing using PLA material: https://all3dp.com/1/3d-printing-materials-guide-3d-printer-material/#pla
-
Testing Tolerance of 3D printer: https://all3dp.com/2/3d-printer-tolerance-test-and-improve-your-3d-printer-s-tolerances
-
Ultimaker manual of 3D printing materials: https://ultimaker.com/en/resources/manuals/materials
-
Overhanging structures in 3D printing over 45 degrees: https://all3dp.com/2/3d-printing-overhang-how-to-master-overhangs-exceeding-45
-
How to deal with material overhangs in 3D printing: https://medium.com/bravovictornovember/3d-print-overhangs-and-how-to-deal-with-them-9eed6a7bcb5d