micro-ROS for ROS2 on Microcontrollers
micro-ROS is a set of software libraries that enables development of robotic applications to be deployed onto microcontrollers that are typically limited in computational resources. The micro-ROS framework is designed for use with ROS 2, and can be leveraged for bidirectional communication between ROS 2 nodes running on a separate compute and the micro-ROS application running on a microcontroller, such as an Arduino. micro-ROS is open-source, and can be highly beneficial for any roboticists aiming to integrate low-level microcontrollers into a robotic system. This page is a tutorial guide for how to setup and use micro-ROS, with an Arduino Due as example hardware.
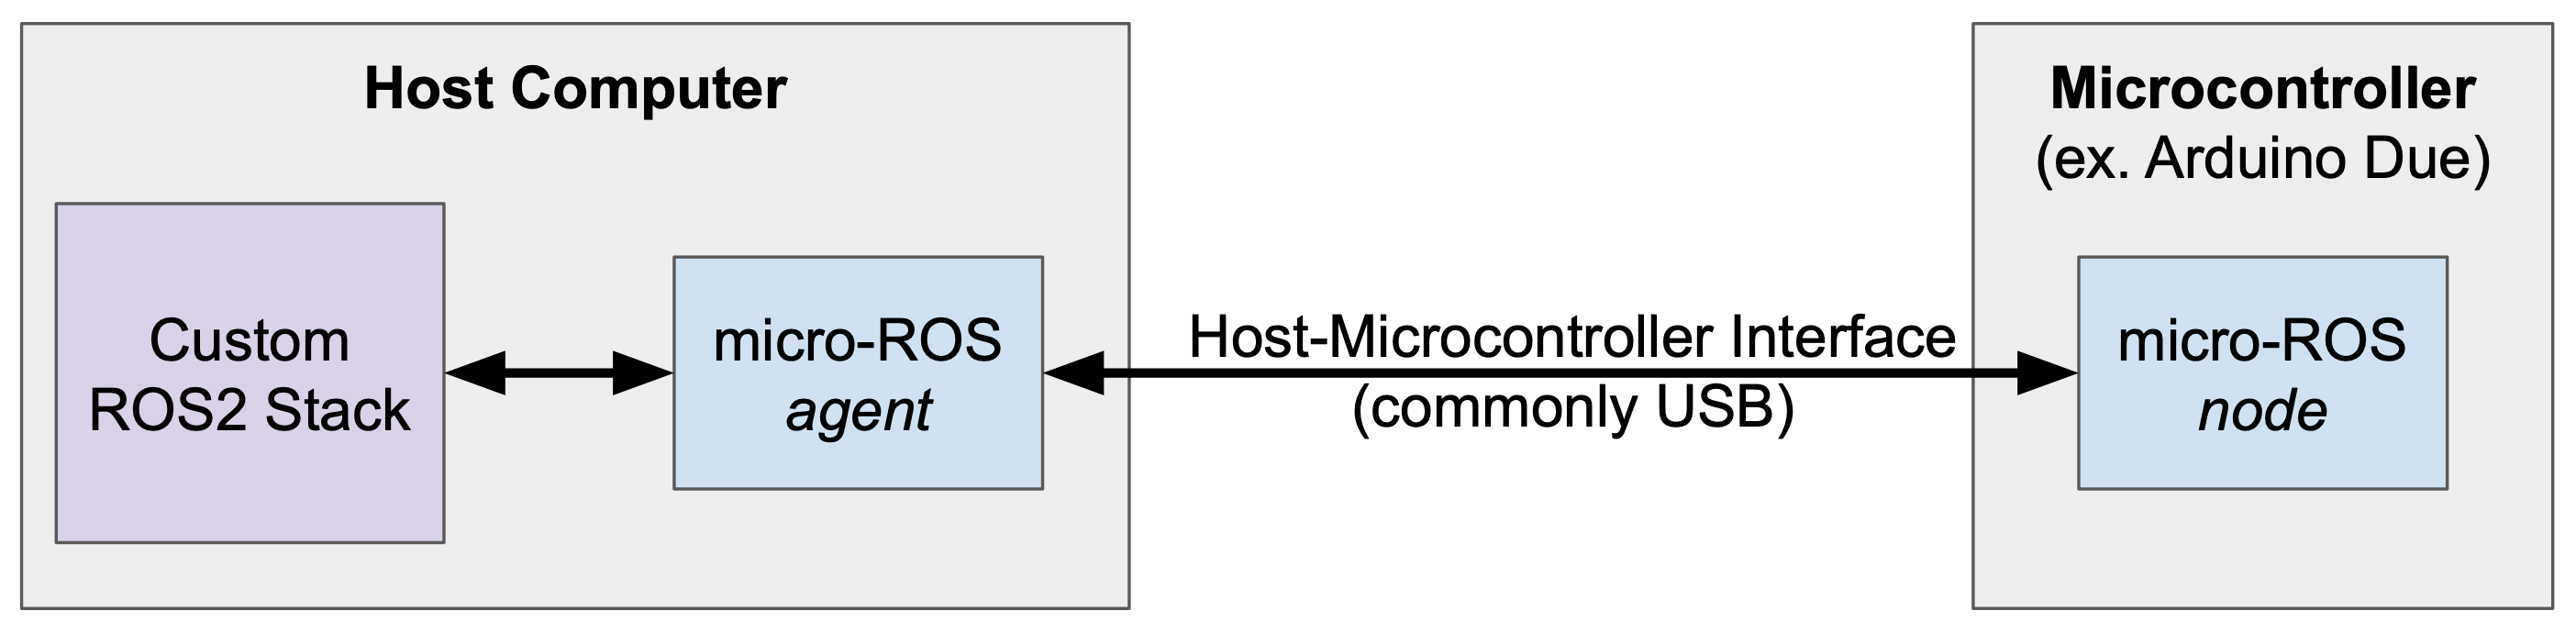
Conceptual Overview
micro-ROS consists of a node running on the microcontroller and an agent running on the host computer. The agent handles the interface between the node and the rest of the ROS2 stack. This allows the ROS2 stack and microcontroller node to publish and subscribe to each other as if the node was like any other ROS2 node. Great! The hardware interface is most commonly a serial connection, such as USB. This tutorial will walk through how to prepare the microcontroller and host computer environments for the node and agent respectively, and then show some examples for how to test the connection and make a first node on the microcontroller.
Installation Overview
At a high-level, there are two sets of micro-ROS libraries involved in the overall installation process. The first will be a set of micro-ROS client libraries specific to your hardware/microcontroller libraires, which will be necessary to build micro-ROS applications that run on the microcontroller. In addition, in order for your micro-ROS application to communicate with the rest of the ROS 2 stack, you will need to install the core micro-ROS libraries onto the host computer. This will allow micro-ROS to be run on your host machine, which will facilitate communication with a connected microcontroller running a micro-ROS application. The following tutorial will walk through installation of all necessary micro-ROS libraries using example hardware.
Prerequisites
It is also assumed that you have a supported microcontroller board on which the micro-ROS application will be built.
The steps will also use ROS2. At time of writing, there are a few possible options for installing micro-ROS with ROS2:
- Install ROS2 natively on the host computer on the computer that will connect to the microcontroller.
At time of writing (May 2022), micro-ROS requires Linux OS for native installation.
- In this case, follow the instructions for Option 1: Installing micro-ROS Natively
- Use a ROS2 Docker container.
- Use a pre-built docker image from micro-ROS that comes with micro-ROS installed in a ROS2 environment. In this case, follow the instructions for Option 2: Using micro-ROS Docker image
Setting Up micro-ROS with Arduino Due
Here we will go through an example of installing the precompiled micro-ROS libraries for an Arduino Due. First, it is necessary to have the Arduino IDE installed, with the Board Manager configured for use with the Arduino Due board. You can confirm this setup by referencing the Arduino Due Quickstart Guide.
The precompiled micro-ROS library can be found on the releases page of the micro-ROS GitHub repository. Download the ZIP file for the precompiled library correponding to your version of ROS 2 (e.g. galactic, foxy, etc.). Then from within the Arduino IDE, you can include the library in your application by navigating to Sketch -> Include Library -> Add .ZIP Library.
For most officially supported boards for micro-ROS, the precompiled library may be all you need to get started. At this time of writing, however, the Arduino Due is a community-supported board which requires an additional patch. To install the patch, run the following commands:
export ARDUINO_PATH=[Your Arduino path]
cd $ARDUINO_PATH/hardware/sam/1.6.12/
curl https://raw.githubusercontent.com/micro-ROS/micro_ros_arduino/galactic/extras/patching_boards/platform_arduinocore_sam.txt > platform.txt
The ARDUINO_PATH referenced above is typically located at one of the following paths:
- On GNU/Linux:
~/.arduino15/packages/arduino - On Windows:
%AppData%\Arduino15\packages\arduino - On macOS:
~/Library/Arduino15/packages/arduino
If you are having difficulty finding this path, feel free to reference Arduino’s documentation for finding the location of installed cores, and be sure to double check that all instructions have been followed in the Arduino Due Quickstart Guide referenced earlier.
After applying the patch, open the Arduino IDE (or if it is already open, close and re-open it). From here you should be able to open a micro-ROS example, e.g. File -> Examples -> micro_ros_arduino -> micro-ros_publisher. Verify that it compiles, and this would conclude the micro-ROS precompiled library installation.
For any troubleshooting, additional instructions can be found at the micro-ROS README
Installing micro-ROS on the Host Computer
Now you will need to install micro-ROS on the host computer. As discussed, there are a couple ways to do this depending on how you want to have your ROS2 environment set up.
Option 1: Installing micro-ROS Natively
To install micro-ROS natively on your host computer, you will first need to have ROS2 installed natively.
Note that you need to be using a Linux OS. If you do not have a Linux OS, then you should try the Docker option.
- Please follow the ROS2 installation guide for official instructions.
Now that you have ROS2 installed (on your Linux host machine), we can install the micro-ROS libraries.
- Run the following commands, as specified in the installation instructions:
```
Source the ROS 2 installation
source /opt/ros/$ROS_DISTRO/setup.bash
Create a workspace and download the micro-ROS tools
mkdir microros_ws cd microros_ws git clone -b $ROS_DISTRO https://github.com/micro-ROS/micro_ros_setup.git src/micro_ros_setup
Update dependencies using rosdep
sudo apt update && rosdep update rosdep install –from-paths src –ignore-src -y
Install pip
sudo apt-get install python3-pip
Build micro-ROS tools and source them
colcon build source install/local_setup.bash
Create firmware
ros2 run micro_ros_setup create_firmware_ws.sh host
Build firmware
ros2 run micro_ros_setup build_firmware.sh source install/local_setup.bash
Download micro-ROS-Agent packages
ros2 run micro_ros_setup create_agent_ws.sh
Build micro-ROS-Agent
ros2 run micro_ros_setup build_agent.sh source install/local_setup.bash
At this point, you should have micro-ROS installed on the host machine and can continue to [Testing the Installation](#testing-the-installation).

### Option 2: Using micro-ROS Docker image

Micro-ROS maintains several Docker images that build on top of ROS2 distributions. The images have variable levels of pre-built functionality. The best one for getting started is the `micro-ros-agent` image that will allow you to run an agent directly! For more information about the images available, and how they are constructed, please see the [micro-ROS docker repository](https://github.com/micro-ROS/docker).

1. First make sure you have Docker installed on your host machine.
> [Docker Desktop for Mac/Windows](https://docs.docker.com/desktop/) OR [Docker Engine for Linux](https://docs.docker.com/engine/install/#server)

2. Then pull the `micro-ros-agent` image, replacing the branch name with the distro version as `microros/<image>:$ROS_DISTRO`. For example, you can pull the image built on ROS2 galactic by using the following command:
docker pull microros/micro-ros-agent:galactic
3. Use the `docker run` command to bring the container up. Specify the interface connection type in the arguments, such as for a udp or serial connection. For example, with a serial connection where the serial device shows up on the host device as `/dev/tty0`, use the following command.

- Note that you may need to play with container port access to allow the container to access the hardware interface. You can mount a device directly by using the --device flag. The should be straightforward on Linux but can be challenging on Mac and Windows. You can also mount many devices easily using [docker compose](https://www.balena.io/docs/learn/develop/hardware/).
- If you are still struggling, you can temporarily give the container privileged access; just be careful with privileged access because it could cause security concerns and/or allow you to accidentally damage devices if you are not careful. [Read more about the risks of privileged mode here](https://learn.snyk.io/lessons/container-runs-in-privileged-mode/kubernetes/) and see the official [Docker documentation on privileged mode](https://docs.docker.com/engine/reference/commandline/run/#/full-container-capabilities-privileged). To give the container privileged access to host hardware, add the `--privileged` flag.
> This command should print out the docker container id. Copy the id, you will need it for the next step!
docker run -d –device=/dev/tty0 –net=host microros/micro-ros-agent:galactic serial –dev /dev/tty0
4. Use the container id from the previous step to enter the container. If you didn't see a print out, you can run `docker container ls` and take the id from there.
docker exec -it
5. Now you should be in the micro-ROS Docker container! Your command line should be prepended with something like `root@docker-desktop:/uros_ws#`. To run the micro-ROS agent, simply run the ros2 node and pass in the arguments for the device you are connecting. with a serial connection where the serial device shows up on the host device as `/dev/tty0`, use the following command.
ros2 run micro_ros_agent micro_ros_agent serial –dev /dev/tty0
Example output waiting for a connected device:
[1651722045.613925] info | TermiosAgentLinux.cpp | init | running… | fd: 3 [1651722045.614570] info | Root.cpp | set_verbose_level | logger setup | verbose_level: 4
This container should be some variant of Linux OS with a ROS2 installation. You should be able to echo and/or publish ROS2 topics to interact with the `node` on the microcontroller!

6. When you are done testing, exit the container by typing exit at the command prompt.
exit

7. Finally, don't forget to stop the container and remove any unnecessary build cache. You can do so by:
1. List the active containers with `docker container list --all`
2. Stop any active containers using `docker container stop <container id>`
3. Remove any stopped containers using `docker container rm <container id>`
4. List any remaining images using `docker image list --all`
5. Remove any remaining images with `docker image rm <image id>`.
> If you want to clear *ALL docker-related files from your system*, use `docker system prune -a --volumes`. This will clear all existing docker files on your host computer, so any existing containers will need to be re-built/re-pulled.
### Advanced Docker Usage
You probably will want to use micro-ROS with your existing ROS2 workspace. To make this happen, simply use the `micro-ros-agent` as the base image in a Dockerfile to support a custom/user-defined ROS2 environment. In this case, you'll also have to source the `uros_ws` as well so that the micro-ROS packages are discovered in your ROS2 environment.
For example, the Dockerfile could look like:
Set micro-ros-agent as base image
FROM microros/micro-ros-agent:galactic as ros_base
Have shells source uros_ws packages and your own packages
echo ‘source /uros_ws/install/setup.bash’ » /root/.bashrc
Export MicroROS DDS settings, assumes ROS_LOCALHOST_ONLY != 1 (from micro-ros_entrypoint.sh)
echo ‘export FASTRTPS_DEFAULT_PROFILES_FILE=/tmp/disable_fastdds_shm.xml’ » /root/.bashrc
Source your own workspace packages
echo ‘source /path/to/your/ws/install/setup.bash’ » /root/.bashrc
Dockerfile entrypoint goes below here
ENTRYPOINT [“/your_entrypoint.sh”] CMD [“bash”]
## Testing the Installation

First, we will test the installation of the precompiled micro-ROS libraries for the microcontroller. Open the Arduino IDE and navigate to `File -> Examples -> micro_ros_arduino -> micro-ros_publisher` to open up an example sketch. Connect your microcontroller to your computer and upload the sketch. If the installation was properly completed, this should compile and upload successfully.

Next, we can initiate the micro-ROS agent to verify installation of the micro-ROS libraries onto the host computer. First check the device name by running `ls /dev`. It will typically be named something like `/dev/ttyACM0` (though if you are not sure, you can always run `ls /dev` before and after plugging in the Arduino to determine what device has changed). A more robust solution would be to utilize udev rules for consistent device naming, though this is outside the scope of this tutorial.

Assuming a device name of `/dev/ttyACM0`, the micro-ROS agent can be initiated by running:
ros2 run micro_ros_agent micro_ros_agent serial –dev /dev/ttyACM0 -v6
The `-v6` parameter is simply for observing debug output, but can be omitted if desired. The micro-ROS agent facilitates the serial communication between the host machine and the microcontroller running micro-ROS; if the agent is successful in communicating with the microcontroller, you should see several `send_message` and `recv_message` debug messages printed to the console. If you don't see this, try hitting the reset button on the Arduino.

Run `ros2 topic list`. You should be able to see the topic `/micro_ros_arduino_node_publisher`. Echo the topic and verify that data is being received from the microcontroller. If you've gotten this far, that means the installation was successful. Congratulations!

NOTE: One caveat is that if the `micro_ros_agent` is killed and restarted, the host machine may stop receiving messages even if the micro-ROS application is still running on the microcontroller. If this occurs, you may need to reset/power cycle the microcontroller for those messages to begin being received again. Work-arounds for this are discussed in [Advanced: Heartbeat for Transient Connectivity](#advanced-heartbeat-for-transient-connectivity).


## Writing an Example micro-ROS Sketch

Publishers and subscribers are best created using the micro-ROS object types, and can also be customized for Quality of Service settings. The best source of documentation is the [micro-ROS docs about publishers and subscribers](https://micro.ros.org/docs/tutorials/programming_rcl_rclc/pub_sub/).

### Quick Start: Single Publisher
This starter Arduino code makes a single publisher for an Int32 message. To try it out, flash the code to a compatible microcontroller, start the agent, and then try to echo the ROS2 topic. The example is modifed from a [micro-ROS publisher demo example](https://github.com/micro-ROS/micro_ros_arduino/blob/1df47435f08b9609effaec9cb0cc99241ff9dc30/examples/micro-ros_publisher/micro-ros_publisher.ino).
// Modified from https://github.com/micro-ROS/micro_ros_arduino/blob/1df47435f08b9609effaec9cb0cc99241ff9dc30/examples/micro-ros_publisher/micro-ros_publisher.ino
#include
#include
#include <std_msgs/msg/int32.h> // ROS message
/* MicroROS declarations */
// NUM_HANDLES must be updated to reflect total number of subscribers + publishers
#define NUM_HANDLES 1
#define RCCHECK(fn)
{
rcl_ret_t temp_rc = fn;
if ((temp_rc != RCL_RET_OK))
{
return false;
}
}
// Declare microros objects rclc_support_t support; rcl_node_t node; rcl_timer_t timer; rclc_executor_t executor; rcl_allocator_t allocator; rcl_publisher_t publisher; std_msgs__msg__Int32 msg;
/* Callbacks */ void timer_callback(rcl_timer_t *timer, int64_t last_call_time) { (void)last_call_time; if (timer != NULL) { rcl_publish(&feedback_pub, &feedback_msg, NULL); } // if (timer != NULL) } // timer_callback()
/* MicroROS functions */ // Functions create_entities and destroy_entities can take several seconds. // In order to reduce this rebuild the library with // - RMW_UXRCE_ENTITY_CREATION_DESTROY_TIMEOUT=0 // - UCLIENT_MAX_SESSION_CONNECTION_ATTEMPTS=3
bool create_entities() { allocator = rcl_get_default_allocator();
// create init_options RCCHECK(rclc_support_init(&support, 0, NULL, &allocator));
// create node RCCHECK(rclc_node_init_default(&node, “arduino_interface_node”, “”, &support));
// create publisher RCCHECK(rclc_publisher_init_default( &publisher, &node, ROSIDL_GET_MSG_TYPE_SUPPORT(std_msgs, msg, Int32), “arduino_publisher”));
// create timer const unsigned int timer_period_ms = 10; RCCHECK(rclc_timer_init_default( &timer, &support, RCL_MS_TO_NS(timer_period_ms), timer_callback));
// create executor executor = rclc_executor_get_zero_initialized_executor(); RCCHECK(rclc_executor_init(&executor, &support.context, NUM_HANDLES, &allocator)); RCCHECK(rclc_executor_add_timer(&executor, &timer)); }
void setup() { // Initialize some micro-ROS stuff set_microros_transports();
// Create the micro-ROS objects create_entities(); }
void loop() { // Keep publishing the message rclc_executor_spin_some(&executor, RCL_MS_TO_NS(1)); }
### Advanced: Heartbeat for Transient Connectivity

You may or may not have transient connections between the microcontroller and the host computer. For example, you may want to stop the `agent` on the host computer but still re-connect to the `node` on the microcontroller.

If the connection between the node and agent is broken, you will need to reset the node on the microcontroller *while* the `agent` is running. I.e. start the `agent`, then restart the `node`. Restarting the `node` can be done in hardware, such as through power cycling the microcontroller, or in software, such as through a "heartbeat" monitor.

Below is starter Arduino code built on a single publisher as modified from a [micro-ROS reconnection example](https://github.com/micro-ROS/micro_ros_arduino/blob/galactic/examples/micro-ros_reconnection_example/micro-ros_reconnection_example.ino). All of the heartbeat logic is handled in the `loop()` function by pinging for the `agent` and re-starting the `node` as needed (note the `destroy_entities()` function). Note that a few extra lines are included for red and green led output to indicate what mode the heartbeat is in: either it is searching for a connection (blinking red) or it has an active connection (green).
// Modified from https://github.com/micro-ROS/micro_ros_arduino/blob/galactic/examples/micro-ros_reconnection_example/micro-ros_reconnection_example.ino
#include
#include
#include <std_msgs/msg/int32.h> // ROS message
/* MicroROS declarations */ // NUM_HANDLES must be updated to reflect total number of subscribers + publishers #define NUM_HANDLES 1 #define LED_PIN 13 // LED pin for debugging heartbeat connection, recommended color = red (significes no connection to agent) #define CONN_PIN 12 // LED pin for debugging heartbeat connection, recommended color = green (signifies active connection to agent)
#define RCCHECK(fn)
{
rcl_ret_t temp_rc = fn;
if ((temp_rc != RCL_RET_OK))
{
return false;
}
}
// Declare microros objects rclc_support_t support; rcl_node_t node; rcl_timer_t timer; rclc_executor_t executor; rcl_allocator_t allocator; rcl_publisher_t publisher; std_msgs__msg__Int32 msg;
bool micro_ros_init_successful; // For heartbeat
/* Callbacks */ void timer_callback(rcl_timer_t *timer, int64_t last_call_time) { (void)last_call_time; if (timer != NULL) { rcl_publish(&feedback_pub, &feedback_msg, NULL); } // if (timer != NULL) } // timer_callback()
/* MicroROS functions */ // Functions create_entities and destroy_entities can take several seconds. // In order to reduce this rebuild the library with // - RMW_UXRCE_ENTITY_CREATION_DESTROY_TIMEOUT=0 // - UCLIENT_MAX_SESSION_CONNECTION_ATTEMPTS=3
bool create_entities() { allocator = rcl_get_default_allocator();
// create init_options RCCHECK(rclc_support_init(&support, 0, NULL, &allocator));
// create node RCCHECK(rclc_node_init_default(&node, “arduino_interface_node”, “”, &support));
// create publisher RCCHECK(rclc_publisher_init_default( &publisher, &node, ROSIDL_GET_MSG_TYPE_SUPPORT(std_msgs, msg, Int32), “arduino_publisher”));
// create timer const unsigned int timer_period_ms = 10; RCCHECK(rclc_timer_init_default( &timer, &support, RCL_MS_TO_NS(timer_period_ms), timer_callback));
// create executor executor = rclc_executor_get_zero_initialized_executor(); RCCHECK(rclc_executor_init(&executor, &support.context, NUM_HANDLES, &allocator)); RCCHECK(rclc_executor_add_timer(&executor, &timer));
micro_ros_init_successful = true; // For heartbeat }
void destroy_entities() { rcl_publisher_fini(&feedback_pub, &node); rcl_node_fini(&node); rcl_timer_fini(&timer); rclc_executor_fini(&executor); rclc_support_fini(&support);
micro_ros_init_successful = false; }
void setup() { // Initialize some micro-ROS stuff set_microros_transports();
// LED pins for debugging heartbeat connection pinMode(LED_PIN, OUTPUT); // Use a resistor with the LED digitalWrite(LED_PIN, HIGH);
pinMode(CONN_PIN, OUTPUT); // Use a resistor with the LED digitalWrite(CONN_PIN, LOW);
// Create the micro-ROS objects create_entities();
// For heartbeat micro_ros_init_successful = false; }
uint32_t delay_ms = 500; // short delay to blink the LED_PIN while trying to connect void loop() { // Keep trying to connect by pinging the MicroROS agent if (RMW_RET_OK == rmw_uros_ping_agent(50, 2)) { // Use flag to see if entities need to be created if (!micro_ros_init_successful) { create_entities(); } else { // Main loop to run the MicroROS node digitalWrite(CONN_PIN, HIGH); // Green LED on digitalWrite(LED_PIN, LOW); // Red LED off rclc_executor_spin_some(&executor, RCL_MS_TO_NS(1)); // Publish the message } } else { // Destroy entities if there is not connection to the agent if (micro_ros_init_successful) { destroy_entities(); digitalWrite(CONN_PIN, LOW); // Green LED off } digitalWrite(LED_PIN, !digitalRead(LED_PIN)); // Blink red LED while trying to connect delay(delay_ms); } } ```
See Also:
- Docker
- ROS Arduino Interface (If using ROS1 as opposed to ROS2)
- udev Rules