Khepera 4
This article with serve as an introduction, overview, and quick-start guide to K-Team’s Khepera 4 robots.
The Khepera 4 is a robot platform designed for indoor applications, meant to operate on tables and floor of labs. They are meant to provide a way to test algorithms developed in simulations or on paper in the real world. They’re most often used to test navigation, swarm, and artificial intelligence applications, providing researchers an easy way to see how their code runs on an actual robot.
Overview
Website about the Khepera 4: link
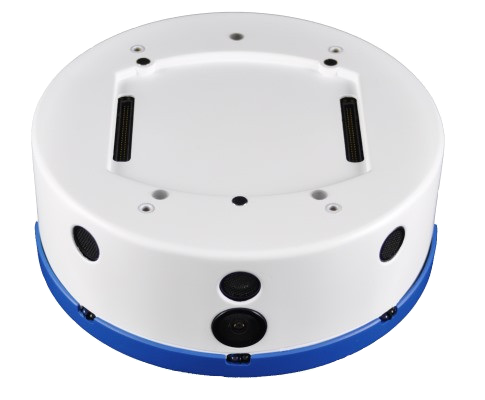
The Khepera 4 is a circular, differential drive robot. It is 140.8 mm in in diameter and can carry up to 2 kg. It has a suite of sensors built-in: 3-axis gyroscope & accelerometer, 5 ultrasonic sensors, 12 infrared sensors, wheel encoders, and a front-facing camera. It also supports various add-ons through connectors at the top of the robot, allowing you to get upward-facing camera or install a LIDAR sensor. More detailed information can be found in the user manual: link
Quick-start guide
The quick-start guide will discuss how to program and compile for the Khepera 4, and how to get it onto the robot.
Programming
To program for the Khepera 4, you will need a cross-compiler. A compiler turns high-level code into machine code that can be executed by a processor. A cross-compiler does the same thing, but for a processor other than the one compiling the code. While you will be developing and compiling the code on your computer, your computer won’t run the code; the Khepera 4 will; therefore, you will need a cross-compiler.
The instructions for installing a cross-compiler can be found in the user manual ch 5. The light toolchain will most likely be sufficient for your use, unless you want to modify the kernel running on the Khepera 4. Follow the instructions to get the cross-compiler; when you get to the FTP, I picked the Gumstix COM Y folder. Continue on with the installation, per the instructions.
Once installation is complete, you can run the make command to use the cross-compiler, assuming the Makefile is set up properly. At the installed location, the template directory will provide example code and Makefile that you can play around with. Using this as an example for the rest of the article, when you run make it will use prog-template.c to generate prog-template.o and template; the latter is the binary that the Khepera 4 will actually use. Now, you have a binary you can execute on the Khepera 4!
WiFi
Before the Khepera 4 can execute your code, you have to get it on their first. The easiest way is SCP, but you need a WiFi connection to do that. Straight out of the box, you probably won’t be able to access it through WiFi, so here’s how you set that up.
First, you need to connect to the Khepera 4 over WiFi:
- Connect to the Khepera 4 using a USB cable; connect it to the robot’s USB mini port. On Ubuntu, the robot should show up as /dev/ttyACM0
- Use a serial port software to communicate with it; I used minicom. To run minicom, run minicom -s
- After running the command above, you can configure your settings; here’s what you need to communicate properly: TODO
Once you have serial communication with the Khepera 4, you can access its files. You’ll need to modify two files: /etc/systemd/network/wifi.network and /etc/wpa_supplicant/wpa_supplicant-wlan0.conf. wifi.network configures what the robot’s IP address should be (or if it should be assigned dynamically by the router). wpa_supplicant-wlan0.conf configures what network it should connect to, and what username or password it should use if that’s the case. Here’s an example for a TPLINK router:
wifi.network:
[Match]
Name=wlan0

[Network]
DNS=192.168.0.1
Address=192.168.0.108/24
ctrl_interface=/var/run/wpa_supplicant
ctrl_interface_group=0
update_config=1

network={
    ssid="TP-Link_ASDF"
    proto=WPA2
    key_mgmt=WPA-PSK
    pairwise=CCMP TKIP
    group=CCMP TKIP
    psk="pwd"
    priority=10
    scan_ssid=1
}
Example above will configure the Khepera 4 to connect to WiFi named TP-Link_ASDF using password pwd, and it will have the IP address of 192.168.0.108 with subnet mask 255.255.255.0. Make sure the DNS is valid for your specific WiFi!
Power cycling the robot after changing the WiFi settings is usually a good idea.
ssh & scp
Now that you have the Khepera 4 connected to the internet, you can SSH into it, allowing you to communicate without relying on a USB cable. Make sure your computer is connected to the same WiFi as the one you configured the Khepera 4 to connect to. Then, use the following command to SSH into the khepera:
ssh root@192.168.0.108
If you’re asked if you trust this IP address, say yes. Now, you can navigate the Khepera 4’s computer like you would a terminal: ls, cp, mv, etc.
If you’re still in the template directory, and you have the binary that you cross-compiled called template, then you can transfer it over to the Khepera 4 using SCP:
cp template root@192.168.0.108:/home/root
This will put the template binary file on the robot with IP address 192.168.0.108 at the location /home/root.
To run the template file, run it like any executable on your on computer. For instance, SSH into the Khepera 4 then use the following command:
./template
Example
When installing the libraries and the cross-compiler, there’s a very useful example provided by K-Team: libkhepera-2.1/src/tests/kh4_example.c. This will provide the user examples for reading sensor data and displaying them to terminal.
Another source for examples is RoboSAR, Team F from MRSD 2023, who has Khepera code that could be useful; here’s their repo: link. The main function simply reads and transmits sensor data (including LIDAR) to another computer on the same network using UDP, using protobuf to package the data. The code also executes some basic obstacle avoidance using infrared sensors, and uses LEDs to alert the user to the status of the robot.
Summary
The Khepera 4 is a robot useful for testing algorithms outside of simulation. We’ve covered how to communicate with it, and how to program it. We’ve also covered some example code that can give insight into how to read and act upon sensor data.