Setup your GPU Enabled System for Computer Vision and Deep Learning
This tutorial will help you setup your Ubuntu (16/17/18) system with a NVIDIA GPU including installing the Drivers, CUDA, cuDNN, and TensorRT libraries. Tutorial also covers on how to build OpenCV from source and installing Deep Learning Frameworks such as TensorFlow (Source Build), PyTorch, Darknet for YOLO, Theano, and Keras. The setup has been tested on Ubuntu x86 platform and should also hold good for other Debian based (x86/ARM64) platforms.
Contents
- Install Prerequisites
- Setup NVIDIA Driver for your GPU
- Install CUDA
- Install cuDNN
- Install TensorRT
- Python and Other Dependencies
- OpenCV and Contrib Modules
- Deep Learning Frameworks
1. Install Prerequisites
Before installing anything, let us first update the information about the packages stored on the computer and upgrade the already installed packages to their latest versions.
sudo apt-get update
sudo apt-get upgrade
Next, we will install some basic packages which we might need during the installation process as well in future.
sudo apt-get install -y build-essential cmake gfortran git pkg-config
NOTE: The following instructions are only for Ubuntu 17 and 18. Skip to the next section if you have Ubuntu 16.04
The defualt gcc vesrion on Ubuntu 17 and 18.04 is gcc-7. However, when we build OpenCV from source with CUDA support, it requires gcc-5.
sudo apt-get install gcc-5 g++-5
Verify the gcc version:
gcc --version
You may stil see version 7 detected. We have to set higher priority for gcc-5 as follows (assuming your gcc installation is located at /usr/bin/gcc-5, and gcc-7’s priority is less than 60.
update-alternatives --install /usr/bin/gcc gcc /usr/bin/gcc-5 60
update-alternatives --install /usr/bin/g++ g++ /usr/bin/g++-5 60
Now, to fix the CXX and CC environment variable system-wide, you need to put the lines in your .bashrc file:
echo 'export CXX=/usr/bin/g++-5.4' >> ~/.bashrc
echo 'export CC=/usr/bin/gcc-5.4' >> ~/.bashrc
source ~/.bashrc
2. Install NVIDIA Driver for your GPU
Before installing the NVIDIA driver, make sure Secure Boot is Disabled in BIOS and Legacy Boot is selected and UEFI Boot is disabled.
NOTE (FOR UEFI BOOT ONLY): If you still intend to install the driver along with UEFI boot enabled, follow the steps below to enroll the MOK keys and only then proceed with the next driver installation section. If these steps are not followed, it is likely that you might face the login loop issue.
sudo openssl req -new -x509 -newkey rsa:2048 -keyout UEFI.key -outform DER -out UEFI.der -nodes -days 36500 -subj "/CN=rambou_nvidia/"
sudo mokutil --import UEFI.der
At this step after reboot you will be prompted to select your certificate to import in in key database. If you have inserted a password at certificate creation you’ll be prompted to insert it. If you are not prompted, you may have to enter the BIOS by using function keys at boot time.
Driver Installation
The NVIDIA drivers will be automatically detected by Ubuntu in Software and Updates under Additional drivers. Select the driver for your GPU and click apply changes and reboot your system. You may also select and apply Intel Microcode drivers in this window. If they are not displayed, run the following commands from your terminal and refresh the window.
sudo add-apt-repository -y ppa:graphics-drivers
sudo apt-get update
At the time of writing this document, the latest stable driver version is 418.
Run the following command to check whether the driver has installed successfully by running NVIDIA’s System Management Interface (nvidia-smi). It is a tool used for monitoring the state of the GPU.
nvidia-smi
In case the above mentioned steps fail or you run into any other issues and have access only to a shell, run the following set of commands to reinstall the driver.
sudo apt-get purge -y nvidia*
sudo add-apt-repository -y ppa:graphics-drivers
sudo apt-get update
sudo apt-get install -y nvidia-418
3. Install CUDA
CUDA (Compute Unified Device Architecture) is a parallel computing platform and API developed by NVIDIA which utilizes the parallel computing capabilities of the GPUs. In order to use the graphics card, we need to have CUDA libraries installed on our system.
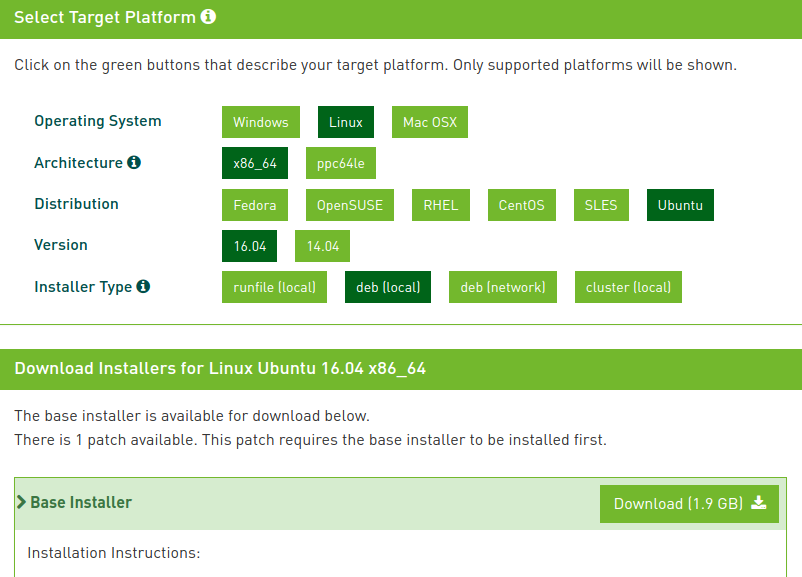
Download the CUDA driver from the official nvidia website here. We recommend you download the deb (local) version from installer type as shown in the screen-shot below.
At the time of writing this document, the latest stable version is CUDA 10.0.
After downloading the file, go to the folder where you have downloaded the file and run the following commands from the terminal to install the CUDA drivers. Please make sure that the filename used in the command below is the same as the downloaded file and replace the <version> number.
sudo dpkg -i cuda-repo-ubuntu1604-10-0-local-10.0.130-410.48_1.0-1_amd64.deb
sudo apt-key add /var/cuda-repo-<version>/7fa2af80.pub
sudo apt-get update
sudo apt-get install cuda
Next, update the paths for CUDA library and executables.
echo 'export LD_LIBRARY_PATH="$LD_LIBRARY_PATH:/usr/local/cuda-10.0/lib64:/usr/local/cuda-10.0/extras/CUPTI/lib64"' >> ~/.bashrc
echo 'export CUDA_HOME=/usr/local/cuda-10.0' >> ~/.bashrc
echo 'export PATH="/usr/local/cuda-10.0/bin:$PATH"' >> ~/.bashrc
source ~/.bashrc
You can verify the installation of CUDA version by running:
nvcc -V
4. Install cuDNN
CUDA Deep Neural Network (cuDNN) is a library used for further optimizing neural network computations. It is written using the CUDA API.
Go to official cuDNN website official cuDNN website and fill out the form for downloading the cuDNN library.
At the time of writing this document, the latest stable version is cuDNN 7.4.
Make sure you download the correct cuDNN version which matches with you CUDA version.
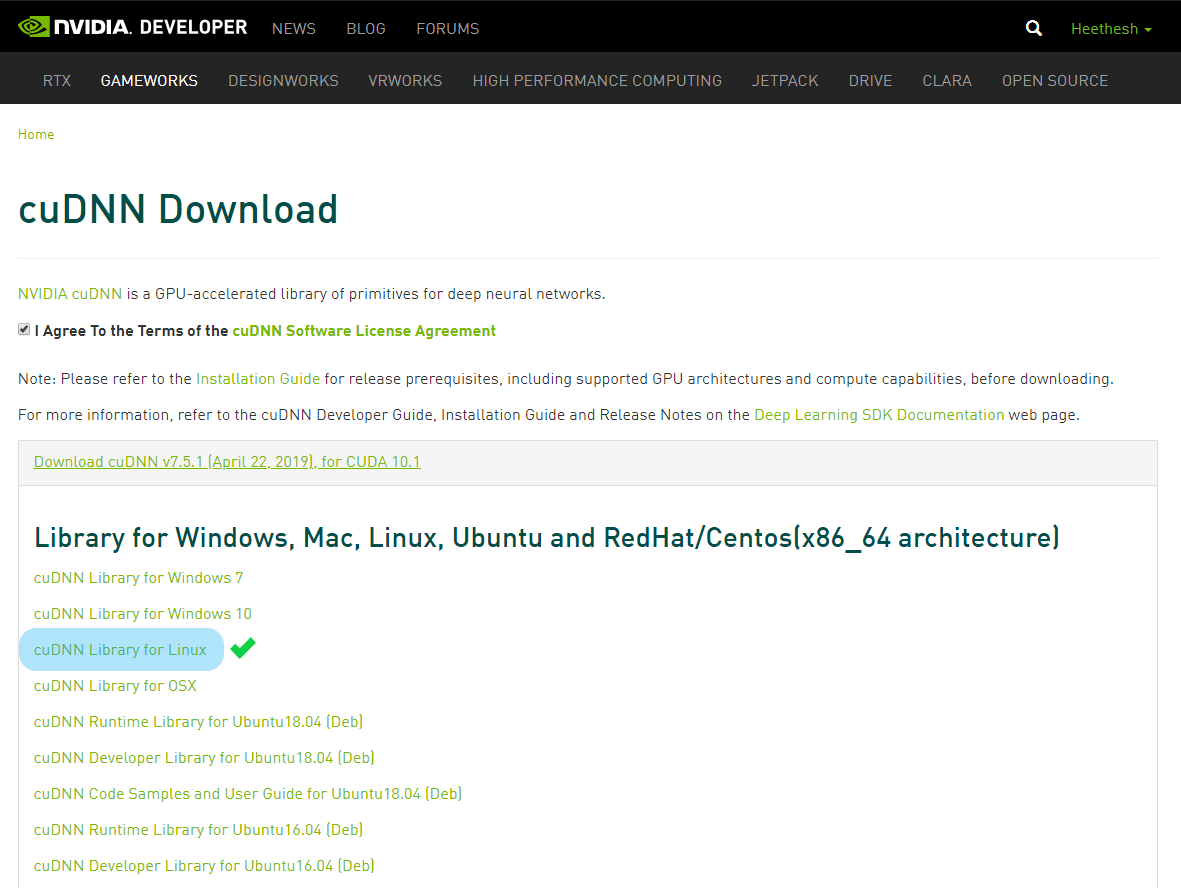
Installing from TAR file (Recommended Method)
For cuDNN downloaded using cuDNN Library for Linux method, go to the folder where you have downloaded the “.tgz” file and from the command line execute the following (update the filename).
tar -xzvf cudnn-10.0-linux-x64-v7.4.2.24.tgz
sudo cp cuda/include/cudnn.h /usr/local/cuda/include
sudo cp cuda/lib64/libcudnn* /usr/local/cuda/lib64
sudo chmod a+r /usr/local/cuda/include/cudnn.h /usr/local/cuda/lib64/libcudnn*
Installing from Debian Package
Install the downloaded packages (Runtime Library, Developer Library and Code Samples) as follows.
sudo dpkg -i libcudnn7_7.4.2.24-1+cuda10.0_amd64.deb
sudo dpkg -i libcudnn7-dev_7.4.2.24-1+cuda10.0_amd64.deb
sudo dpkg -i libcudnn7-doc_7.4.2.24-1+cuda10.0_amd64.deb
To check installation of cuDNN, run this in your terminal:
dpkg -l | grep cudnn
Fixing Broken Symbolic Links
If you have issues with broken symbolic links when you run sudo ldconfig, follow the steps below to fix them. Note the minor version number, which may differ on your system (shown for 7.4.2 here)
cd /usr/local/cuda/lib64
sudo rm libcudnn.so
sudo rm libcudnn.so.7
sudo ln libcudnn.so.7.4.2 libcudnn.so.7
sudo ln libcudnn.so.7 libcudnn.so
sudo ldconfig
5. Install TensorRT
The core of NVIDIA TensorRT facilitates high performance inference on NVIDIA graphics processing units (GPUs). TensorRT takes a trained network, which consists of a network definition and a set of trained parameters, and produces a highly optimized runtime engine which performs inference for that network.
At the time of writing this document, the latest stable version is TensorRT 5.0.4.
Download the TensorRT local repo file from here and run the following commands. You’ll need to replace ubuntu1x04, cudax.x, trt4.x.x.x and yyyymmdd with your specific OS version, CUDA version, TensorRT version and package date (refer the downloaded filename).
sudo dpkg -i nv-tensorrt-repo-ubuntu1x04-cudax.x-trt5.x.x.x-ga-yyyymmdd_1-1_amd64.deb
sudo apt-key add /var/nv-tensorrt-repo-cudax.x-trt5.x.x.x-ga-yyyymmdd/7fa2af80.pub
sudo apt-get update
sudo apt-get install tensorrt
For Python and TensorFlow support, run the following commands.
sudo apt-get install libnvinfer5 python-libnvinfer-dev python3-libnvinfer-dev
sudo apt-get install uff-converter-tf
To check installation of TensorRT, run this in your terminal:
dpkg -l | grep TensorRT
6. Python and Other Dependencies
Install dependencies of deep learning frameworks:
sudo apt-get install -y libprotobuf-dev libleveldb-dev libsnappy-dev libhdf5-serial-dev protobuf-compiler libopencv-dev
Next, we install Python 2 and 3 along with other important packages like boost, lmdb, glog, blas etc.
sudo apt-get install -y --no-install-recommends libboost-all-dev doxygen
sudo apt-get install -y libgflags-dev libgoogle-glog-dev liblmdb-dev libblas-dev
sudo apt-get install -y libatlas-base-dev libopenblas-dev libgphoto2-dev libeigen3-dev libhdf5-dev

sudo apt-get install -y python-dev python-pip python-nose python-numpy python-scipy python-wheel python-six
sudo apt-get install -y python3-dev python3-pip python3-nose python3-numpy python3-scipy python3-wheel python3-six
NOTE: If you want to use Python2, replace the following pip commands with pip2.
Before we use pip, make sure you have the latest version of pip.
sudo pip3 install --upgrade pip
Now, we can install all the required python packages for deep learning frameworks:
sudo pip3 install numpy matplotlib ipython protobuf jupyter mock
sudo pip3 install scipy scikit-image scikit-learn
sudo pip3 install keras_applications==1.0.6 --no-deps
sudo pip3 install keras_preprocessing==1.0.5 --no-deps
Upgrade numpy to the latest version:
sudo pip3 install --upgrade numpy
7. Install OpenCV and Contrib Modules
First we will install the dependencies:
sudo apt-get remove -y x264 libx264-dev
sudo apt-get install -y checkinstall yasm
sudo apt-get install -y libjpeg8-dev libjasper-dev libpng12-dev

sudo apt-get install -y libtiff5-dev
sudo apt-get install -y libavcodec-dev libavformat-dev libswscale-dev libdc1394-22-dev

sudo apt-get install -y libxine2-dev libv4l-dev
sudo apt-get install -y libgstreamer0.10-dev libgstreamer-plugins-base0.10-dev
sudo apt-get install -y libqt4-dev libgtk2.0-dev libtbb-dev
sudo apt-get install -y libfaac-dev libmp3lame-dev libtheora-dev
sudo apt-get install -y libvorbis-dev libxvidcore-dev
sudo apt-get install -y libopencore-amrnb-dev libopencore-amrwb-dev
sudo apt-get install -y x264 v4l-utils
NOTE: Checkout to the latest version of OpenCV. 3.4.5 is used here
Download OpenCV 3.4.5:
git clone https://github.com/opencv/opencv.git
cd opencv
git checkout 3.4.5
cd ..
Download OpenCV-contrib 3.4.5:
git clone https://github.com/opencv/opencv_contrib.git
cd opencv_contrib
git checkout 3.4.5
cd ..
NOTE: Keep the build folder in the same location as it may be required in future to upgrade or uninstall OpenCV
Configure and generate the MakeFile in /opencv/build folder (make sure to specify paths to downloaded OpenCV-contrib modules correctly):
cd opencv
mkdir build
cd build

cmake -D CMAKE_BUILD_TYPE=RELEASE \
      -D CMAKE_INSTALL_PREFIX=/usr/local \
      -D INSTALL_C_EXAMPLES=ON \
      -D INSTALL_PYTHON_EXAMPLES=ON \
      -D WITH_TBB=ON \
      -D WITH_V4L=ON \
      -D WITH_QT=ON \
      -D WITH_OPENGL=ON \
      -D WITH_CUDA=ON \
      -D OPENCV_EXTRA_MODULES_PATH=../../opencv_contrib/modules \
      -D BUILD_EXAMPLES=ON ..
NOTE: If you are using Python3, you must add the following flag as well
-D PYTHON_DEFAULT_EXECUTABLE=/usr/bin/python3 \
NOTE: If you are using Ubuntu 17 or 18, you must add the following flags as well
      -D CMAKE_CXX_COMPILER:FILEPATH=/usr/bin/g++-5 \
      -D CMAKE_C_COMPILER:FILEPATH=/usr/bin/gcc-5 \
Compile and install:
make -j$(nproc)
sudo make install
sudo ldconfig
Retain the build folder in the same location. This will be required if you want to uninstall OpenCV or upgrade in the future or else the uninstall process might become very tedious.
Check installation of OpenCV:
python
>>> import cv2
>>> cv2.__version__
NOTE: If you get any errors with import cv2, make sure the PYTHONPATH points to the location of cv2.so file correctly in your ~/.bashrc file as follows.
export PYTHONPATH=/usr/local/lib/python2.7/site-packages:$PYTHONPATH
export PYTHONPATH=/usr/local/lib/python3.5/site-packages:$PYTHONPATH
To uninstall OpenCV:
cd /opencv/build
sudo make uninstall
8. Install Deep Learning Frameworks
PyTorch
You can run the commands for installing pip packages torch and torchvision from the Quick Start section here.
TensorFlow
Quick Install (Not Recommended)
A quick way to install TensorFlow using pip without building is as follows. However this is not recommended as we have several specific versions of GPU libraries to improve performance, which may not be available with the pip builds.
sudo pip3 install tensorflow-gpu
Building TensorFlow from Source
Now we will download the TensorFlow repository from GitHub in the /home folder. Checkout to the latest version of TensorFlow (r1.13 is used here).
cd ~
git clone https://github.com/tensorflow/tensorflow.git
cd tensorflow
git checkout r1.13
Next we need to install Bazel along with its dependencies
sudo apt-get install pkg-config zip zlib1g-dev unzip
wget https://github.com/bazelbuild/bazel/releases/download/0.21.0/bazel-0.21.0-installer-linux-x86_64.sh
chmod +x bazel-0.21.0-installer-linux-x86_64.sh
./bazel-0.21.0-installer-linux-x86_64.sh --user

export PATH="$PATH:$HOME/bin"
source ~/.bashrc
To verify installation of Bazel run:
bazel version
Now install brew on your system:
sudo apt-get install linuxbrew-wrapper
brew doctor
brew install coreutils
The root of the tensorflow folder contains a bash script named configure. This script asks you to identify the pathname of all relevant TensorFlow dependencies and specify other build configuration options such as compiler flags. You must run this script prior to creating the pip package and installing TensorFlow.
cd ~/tensorflow
./configure
NOTE: Enter the your correct CUDA and CuDNN version below. CUDA 10.0 and CuDNN 7.4 is used here
Select Python 3, no to all additional packages, gcc as compiler (GCC 5.4).
For CUDA, enter 10.0
For cuDNN, enter 7.4
Select yes for TensorRT support
Enter your GPU Compute Capability (Eg: 3.0 or 6.1). Find yout GPU Compute Capability from here.
Use nvcc as the CUDA compiler.
Finally, build the pip package:
bazel build --config=opt --config=cuda --cxxopt="-D_GLIBCXX_USE_CXX11_ABI=0" //tensorflow/tools/pip_package:build_pip_package
The build might take upto an hour. If it fails to build, you must clean your build using the following command and configure the build once again.
bazel clean --expunge
./configure
The bazel build command builds a script named build_pip_package. Running this script as follows will build a .whl file within the /tmp/tensorflow_pkg directory:
bazel-bin/tensorflow/tools/pip_package/build_pip_package /tmp/tensorflow_pkg
Once the build is complete, invoke pip install to install that pip package. The filename of the .whl file depends on your platform. Use tab completion to find your package. If you get an error saying package is not supported for the current platform, run pip explicity (as pip2 for Python 2.7).
sudo pip3 install /tmp/tensorflow_pkg/tensorflow <TAB> (*.whl)
You can make a backup of this built .whl file.
cp /tmp/tensorflow_pkg/tensorflow <TAB> (*.whl) <BACKUP_LOCATION>
Verify that TensorFlow is using the GPU for computation by running the following python script.
NOTE: Running a script from the /tensorflow root directory might show some errors. Change to any other directory and run the following python script.
import tensorflow as tf
with tf.device('/gpu:0'):
    a = tf.constant([1.0, 2.0, 3.0, 4.0, 5.0, 6.0], shape=[2, 3], name='a')
    b = tf.constant([1.0, 2.0, 3.0, 4.0, 5.0, 6.0], shape=[3, 2], name='b')
    c = tf.matmul(a, b)

with tf.Session() as sess:
    print (sess.run(c))
Here,
- “/cpu:0”: The CPU of your machine.
- “/gpu:0”: The GPU of your machine, if you have one.
If you have a gpu and can use it, you will see the result. Otherwise you will see an error with a long stacktrace.
Keras
sudo pip3 install keras
Theano
sudo pip3 install Theano
Darknet for YOLO
First clone the Darknet git repository.
git clone https://github.com/pjreddie/darknet.git
Now, to compile Darknet with CUDA, CuDNN and OpenCV support, open the Makefile from the darknet folder and make the changes as following in the beginning of this file. Also make sure to select the right architecture based on your GPU’s compute capibility. For Pascal architecture you may want to use this version of Darknet by AlexeyAB and compile with the CUDNN_HALF=1 flag for 3x speed improvement.
GPU=1
CUDNN=1
OPENCV=1
Once done, just run make from the darknet folder.
cd darknet
make
Refer here for more details on running YOLO and training the network.
References
The tutorial is actively maintained at https://github.com/heethesh/Computer-Vision-and-Deep-Learning-Setup/.
| Issues Page | Contributions Page (Pull Requests) |