ROS 1 - ROS 2 Bridge
ROS 2 is widely used nowadays due to its better security features and code organization. A lot of standard and important ROS 1 packages, though, have not yet been ported to ROS 2 or just are more stable in ROS 1, for example, rosserial, husky-base. The ROS 1 bridge allows having ROS 1 and ROS 2 on the same network and bridging topics to communicate between the two. This wiki entry includes a tutorial to set up the ros1-bridge package and cover dynamic and static bridges, including good practices for sourcing.
Conceptual Overview
ROS 1 - ROS 2 Bridge
The ROS 1 bridge is a ROS 2 package that provides nodes to bridge topics between ROS 1 and ROS 2. A point to be noted here is that bridging is only available on Ubuntu 20.04, as this distribution is the only one that supports both ROS 1 Noetic and ROS 2 Foxy. This package is capable of bridging the stantard ROS interfaces (messages/services) listed in the ros2/common_interfaces repository. To use the bridge with custom message types, the package needs to be build from source, and the custom types should also be sourced in seperate ROS 1 and ROS 2 workspaces. Services need to be bridged explicitly between ROS 2 and ROS 1, and ROS 1 and ROS 2.
Installation:
Installation instructions are provided in the ROS 1 bridge repository README. Note that you need to have both ROS 1 Noetic and ROS 2 Foxy installed in the system. There are 2 main ways to install the bridge:
- Install pre-built binaries
sudo apt install ros-foxy-ros1-bridge -
Build from source
- Build everything except ROS 1 bridge:
colcon build --symlink-install --packages-skip ros1_bridge - Source ROS 1 instal
source /opt/ros/noetic/setup.bash - Source ROS 2 install
source /opt/ros/foxy/setup.bash - Build the ROS 1 bridge
colcon build --symlink-install --packages-select ros1_bridge --cmake-force-configure
- Build everything except ROS 1 bridge:
NOTE:
It is a good practice to not keep any ROS 1 or ROS 2 installation sourced by default. Instead, we can set aliases in our .bashrc file to source the ROS 1 or ROS 2 installation when needed. Add the following lines to your .bashrc file:
alias sr1='source /opt/ros/noetic/setup.bash'
alias sr2='source /opt/ros/foxy/setup.bash'
Then, to source ROS 1, type sr1 in the terminal, and to source ROS 2, type sr2 in the terminal. This way, we can avoid conflicts between ROS 1 and ROS 2 installations.
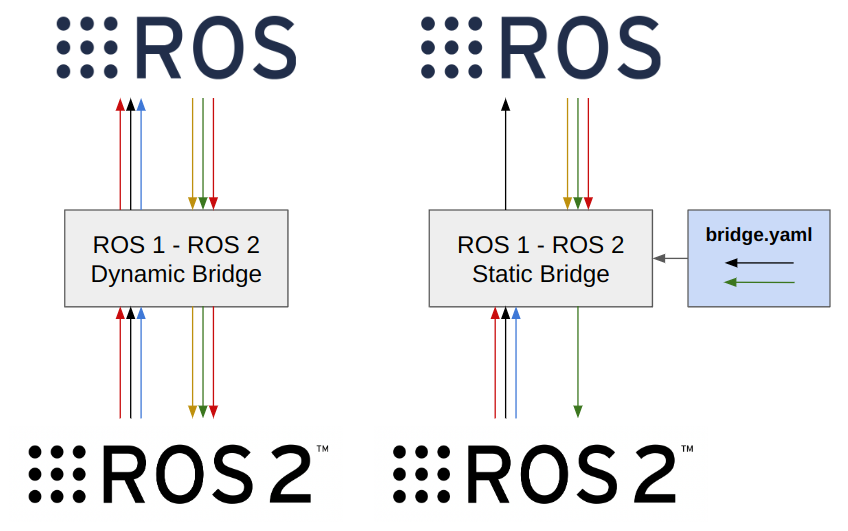
Types of Bridges
There are two types of bridges available:
- Dynamic Bridge:
This is a dynamic bridge option that straightaway bridges all topics between ROS 1 and ROS 2. This is the easiest way to get started with the bridge. This approach works well for small projects, but for larger projects, it is recommended to use the static bridge, as bridging all topics adds a lot of overhead to the system. This bridge can be launched directly with the following command:
ros2 run ros1_bridge dynamic_bridge --bridge-all-topics - Static Bridge:
This option bridges topics and services specified by a yaml file. An example yaml file is shown below:
 topics:
 -
     topic: /name
     type: std_msgs/msg/String
     queue_size: 1

 services_2_to_1:
 -
     service: /add_two_ints  # ROS 1 service name
     type: roscpp_tutorials/TwoInts  # The ROS 1 service name

 services_1_to_2:
 -
     service: /add_two_ints  # ROS 2 service name
     type: example_interfaces/srv/AddTwoInts  # The ROS 2 service name
Configure the topics to build and save the .yaml file as
bridge.yaml. Then assuming you hase set the aliases properly in your .bashrc file, run the following command:sr1 && rosparam load /<path to yaml>/bridge.yaml && sr2 && ros2 run ros1_bridge parameter_bridge
Setting up the bridge in Docker
Docker containers are powerful tools to use while developing software because they allow hardware agnostic development. The official ros docker image is available with the bridge already preconfigured. Here is an example docker file
FROM ros:foxy-ros1-bridge-focal

RUN apt update

# Link to allow sourcing
RUN rm /bin/sh && ln -s /bin/bash /bin/sh

# Alias for sourcing
# sr1 -> source ros 1, sr2 -> source ros 2
RUN echo "alias sr1='source /opt/ros/noetic/setup.bash'" >> ~/.bashrc
RUN echo "alias sr2='source /opt/ros/foxy/setup.bash" >> ~/.bashrc

# Example building ROS 1 workspace in dockerfile
RUN cd ~/ros1_ws; source /opt/ros/noetic/setup.bash; catkin_make

# Example building ROS 2 workspace in dockerfile
RUN cd ~/ros2_ws; source /opt/ros/foxy/setup.bash; colcon build

CMD ["bash"]
We recommend creating two small scripts to run the docker container and attach a terminal to a docker container. This setup assumes the following folder structure:
root
- run_docker.sh
- terminal_docker.sh
- ros1_ws
    - src
- ros2_ws
    - src
- A script to run the docker container with display attached, network mode host to communicate over host network devices, and ROS 1 and ROS 2 src files code mounted. It assumes the following code structure:
run_docker.sh
xhost +local:root docker container prune -f docker run --privileged --rm -it \ --name="image_name" \ --env="DISPLAY=$DISPLAY" \ --env="QT_X11_NO_MITSHM=1" \ --volume="/tmp/.X11-unix:/tmp/.X11-unix:rw" \ --volume="$XAUTH:$XAUTH" \ -v /dev:/dev \ -v $(pwd)/ros1_ws/src:/home/ros1_ws/src \ -v $(pwd)/ros2_ws/src:/home/ros2_ws/src \ -t \ image_name \ bash \ - A script to attach a given terminal to the running docker container.
terminal_docker.sh
docker exec -it image_name bashWhenever you attach to a terminal, you can type
sr1orsr2to source ROS 1 or ROS 2 respectively. These aliases can also be used inside startup scripts to run nodes from the ROS 1 or ROS 2 workspace.