CMake and Other Build Systems
Programs written in compiled languages like C/C++ must be compiled before being run, a process which converts the high-level code written by the programmer into binary files that can be executed on a particular architecture. A build system is a framework that automates the process of compiling files in a project with a specified compiler, and also links predefined libraries of code that are referenced in the project files. By using a build system, a developer can reduce the process of compiling a project to a single line in a terminal, avoiding the redundant steps of managing each file independently.
Popular build tools include Autotools, Make, Maven, Gradle, and Ninja. Each of these frameworks contains a set of protocols for managing project compilation, and the developer can specify the exact requirements, targets, and dependencies for their project. The Make build system refers to these specifications as a Makefile, although other build systems use other terms.
Writing a Makefile can be a complicated task, especially for larger projects. CMake is a tool that simplifies the generation of Makefiles for Make, Android Studio, Ninja, and others. CMake is open-source, and is available for Windows, Mac, and Linux. When a project that uses CMake is built, CMake will first generate a Makefile, and then that file will be used to instruct the build system in executing the project compilation.
When using CMake, it is common and accepted practice to organize a project folder according to a specific folder structure, as seen in the image below.
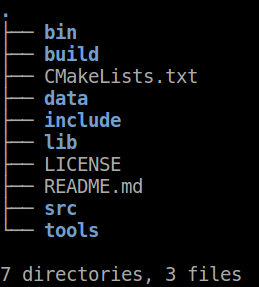
- bin: contains the executable files which can be run on the computer.
- build: contains the makefiles which are required to build the project.
- CMakeLists.txt: the script that CMake uses to generate the makefiles. Also references additional CMakeLists files in src to generate additional makefiles for subsections of the project.
- data: contains any data required by the project.
- include: stores a header file for each of the project files in src.
- lib: contains the static libraries which are linked to the appropriate executable files.
- LICENSE: a text or binary file that verifies the project’s authenticity.
- README.md: the text file that describes the project and any additional information needed to run or build it.
- src: contains the project files that need to be compiled into executables and also the project files that act as libraries.
- tools: contains any scripts that need to be executed only once during the project life cycle. This may involve scripts to download and/or process data.
One of the features that CMake provides is that a project can have multiple CMakeLists.txt files. Each of these is a script for defining the rules to compile one or more files in the project. When the project is built, each of these scripts can be invoked from the outermost CMakeLists.txt file. A project can have multiple layers of Cmake scripts in this manner. This hierarchy of scripts allows a developer to easily manage large projects that depend on external libraries and packages. It is considered good practice to keep individual scripts short, and use this hierarchical structure to organize different modules of the project.
The nature of CMake scripts makes it simple to incorporate external libraries into a project. If the external library has a CMakeLists.txt file of its own, this file can be referenced in the outermost CMake script of the project. This will also compile any changes made to the source files of the external package without having to build that package separately. We can include the headers from the external library the same way we include our custom header files.
The outer CMakeLists file configures the project at a high level, including the version of CMake being used, the name of the project, and any global properties that are used to organize the build output. This file will also contain a list of all subdirectories that contain inner CMake scripts. The bulk of the work is done by these inner files, which specify which target source files will be converted into executables and which will be used as libraries, and link target files with the appropriate libraries.
When it is time to initialize the build process, the outer level CMakeLists.txt is generally invoked from inside the build directory by using ‘cmake ..’. Next, the command ‘make’ should be sent in order to actually build the project.
Some of the most common and useful functions employed in CMake scripts are as follows:
Within the inner CMake scripts, the path to the outer level CMake script can be referenced using
${CMAKE_SOURCE_DIR}
The inner level scripts can be added to the top-level script by using the command
add_subdirectory(path_to_script)
The directory containing the project header files can be specified by using
include_directories(directory1, directory2, ...., directoryN)
The program files to be used as libraries can be specified using
add_library(library_name STATIC
  path_to_file1
  path_to_file2
  ....
  path_to_fileN)
The program files to be converted into executables can be specified using
add_executable(exec_name path_to_src_file)
Libraries can be linked to executables by using
target_link_libraries(exec_name PUBLIC library_name)
It is recommended to develop a familiarity with and understanding of the various functions provided by CMake, rather than merely copying code snippets found online. For a full description of the components of a CMakeLists.txt file, reference this tutorial by the official CMake website.
CMake also provides a GUI that can be used to assemble scripts without writing them by hand. This GUI provides interfaces to designate modules as executables and libraries, and to link libraries to relevant files. The project can then be built from within the GUI, bypassing the need to interact with the terminal. This GUI option is popular for developers who work on Windows, where the command prompt is used less frequently.
Recommended Reading
- Offical CMake tutorial: https://cmake.org/cmake/help/latest/guide/tutorial/index.html
- John Lamp’s tutorials: https://www.johnlamp.net/cmake-tutorial.html
- A more basic but hand-on tutorial: http://mirkokiefer.com/blog/2013/03/cmake-by-example/
- Derek Molloy’s BeagleBone tutorial: http://derekmolloy.ie/hello-world-introductions-to-cmake/